Tigers Impact And Beyond
- by Kelvin Miyahira
When I wrote a column about Tiger’s impact, I think it was just half the story. Just as important as it is to get to impact in a great position, there is a need to continue to drive your way through impact so that you can hit it both far and straight.
Using my Casio EX-F1 super high speed digital camera, I shot this video at 300 frames per second to get these awesome pictures of Tiger’s swing while at the US Open at Torrey Pines in June 2008. Take a look at how great he swings even with an injured left leg.


His left wrist begins to flatten and the left forearm begins to rotate. Notice the position of the left forearm and wrist bone. It is beginning to rotate towards the target along with the back of the left hand.
Amateurs typically do not rotate these segments and typically their left wrist would be in a a cupped position with the knuckles on the left hand leading. So it gets to the point where the only chance to compensate would be to flip the clubface closed.

Just before impact, his right elbow is still driving forward. His right wrist is very much cocked back and holding.

Tiger has a nicely flat wrist at impact. His right arm is extended but notice the right wrist still has not released yet. This one final segment (right wrist) could add more power but at what cost? Added wildness?


One key element of his arm movement is the left arm does not fold early. Flippers and handsy players would typically have their left elbow in a slightly bent position with the left elbow pointed down. Tiger has his left elbow pointed directly behind him. This once again proves how little hand or arm action he's using to hit the ball. He's doing everything he can to provide stabilization of the hands and wrists rather than to make them more active. Thus, his body is more active than most and his arms break down far later than most.

Do you see any rehinging yet?
Variable Resistance Heavy Club
Last month’s article featured Melanie, the caster/chicken winger that fixed her swing using the heavy club I’ve devised. It works so well that I’ve decided to let everyone try to make one for themselves if they want. I have instructions, material and tool list at the end of this article for you to follow. If you’re not handy and can’t make it, we could make it for you. Just email me at This email address is being protected from spambots. You need JavaScript enabled to view it..
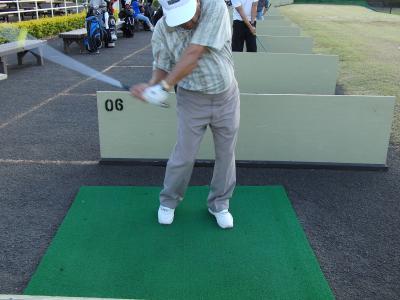
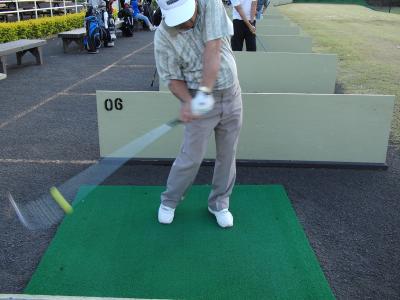
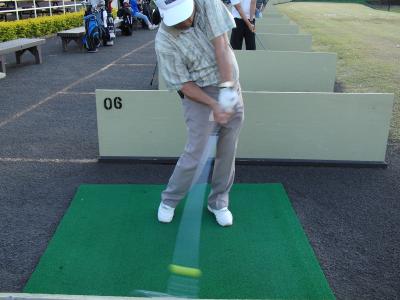
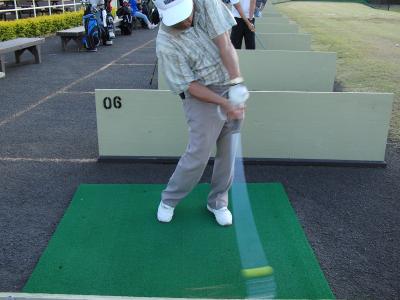
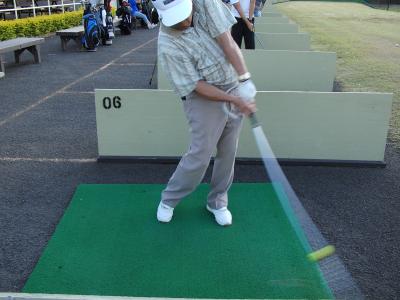
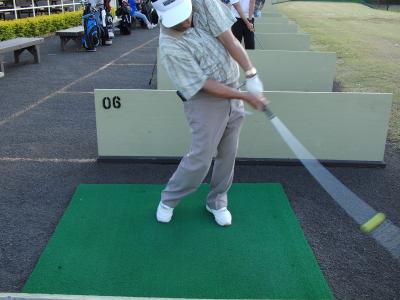
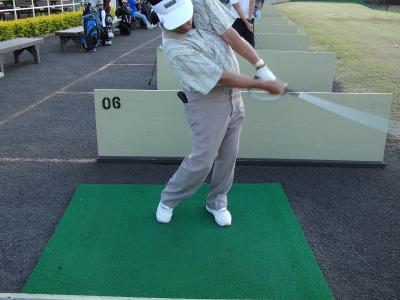
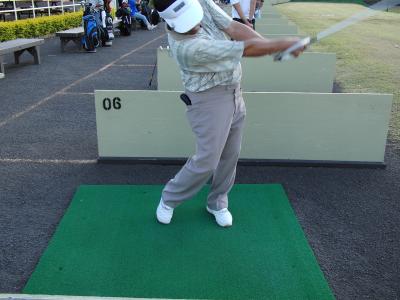
Here’s another success story. 72-year-old Ron Shirai of Electronic Business Machines is a long time golfer that has always had trouble getting too steep in his old age. He couldn’t turn well on the backswing so his arms would just float up and get steep. From there, he’d hit choppy pull hooks and weak fades. Despite that he had a 16 handicap but was going downhill as the age factor crept in. Until now……….
A couple of weeks ago, I let him try my variable resistance heavy club and he swung it everyday. It helped him with his flexibility so he could turn better, get on a flatter plane and more importantly got his sequencing right. By doing so he also improved his impact position resulting in better contact and more clubhead speed.
One week later he shot a 79 and was hitting the ball 20-25 yards farther on every club. He was in places he’d never been at his home course so it was surely helping him. Take a look at his sequences.


Isn’t that just like Tiger?
Variable Resistance Heavy Club

Material list
- Taper tip iron shaft is best but parallel tip will work as well. Dynamic or any shaft with large butt .620 is better than .600. Cut shaft to 38” long.
- ½” rebar cut to approximately 12-14” long.
- Fine sand
- 5/16” diameter 4” to 6” long eyebolt
- solid golf ball
- short 5" piece of chain 2/0 twist link chain
- short 5” piece of ¼” chain
- 2 - 3/16” quicklinks
- nylon cord, shoestring or leather shoelace for whip effect
- epoxy
- golf grip
Tools
- Drill
- Metal cutting saw or hacksaw
- Grinding wheel
How to assemble
- Start by drilling ball with 3/8” drill bit. Be sure ball is not wound type. Must be solid ball.
- Epoxy ball onto shaft. Bottom of ball should be flush with bottom of shaft.
- Epoxy the eyebolt into the end of the golf shaft.
- Once eyebolt is set, test fit rebar to see if the entire 14” of rebar will fit into butt end of shaft. If close, within a few inches, some grinding on the lower part of the rebar will help to make it fit. If really far from fitting, may have to cut shorter, then try to refit.
- Pour sand into shaft. Be sure to leave enough space for the rebar to fit as well.
- Insert rebar into shaft.
- Pour more sand into shaft to make it fill gaps between the shaft and rebar.
- Cover top of shaft with grip tape so sand does not escape.
- Wrap grip tape on shaft as usual and install grip.
- Connect quicklink to eyebolt ring and connect to the larger segment of chain.
- Connect larger chain to smaller chain using the quicklink. Be sure to epoxy the threads of the quicklink so as to secure it permanently.
- Last, tie some thin nylon cord or I’ve used leather shoelace, to the end of the chain for whip effect. Cord should extend approximately 10” out beyond the chain. If using nylon, be sure to burn the tips to keep it from unraveling.
If you have any questions or would like us to assemble one of these high center of gravity, variable resistance heavy clubs, email me at This email address is being protected from spambots. You need JavaScript enabled to view it..