Essentials Of The Drive Hold Golf Swing
December 2013
- by Kelvin Miyahira
Click here for the French Translation by Robin Cocq
Winter is almost here and many of you will have a lot of time to work on retooling your swing before spring comes around. So after all these years of detailing the complexity, to really help you make the most of the off-season, here’s the Cliff Notes version of the golf swing with nothing but the simple, essential macro movements listed here.
Strong Grip
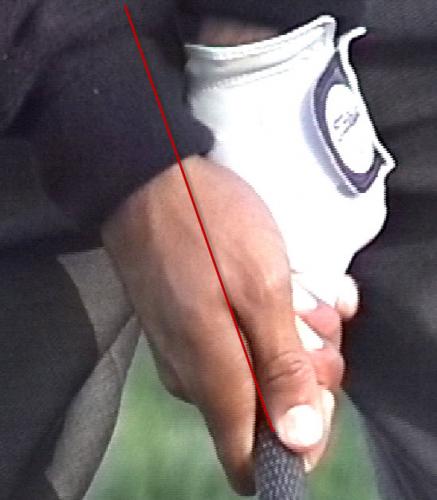
This is pretty obvious. See Tiger’s grip in early 2000’s. Right hand “V” pointed to right shoulder and three-knuckle left hand grip. If your grip is strong enough, you will need less left forearm supination/left wrist flexion to get the clubface squared up early and remain stable through impact.
Good Posture
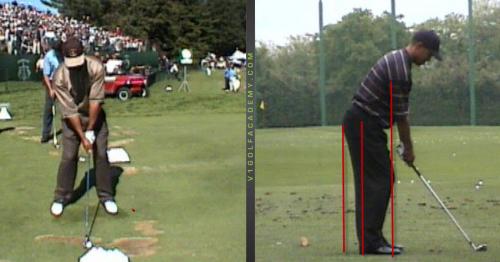
Tiger is ready for action with weight on his balls of feet. This is no doubt the most athletic looking posture of all time.
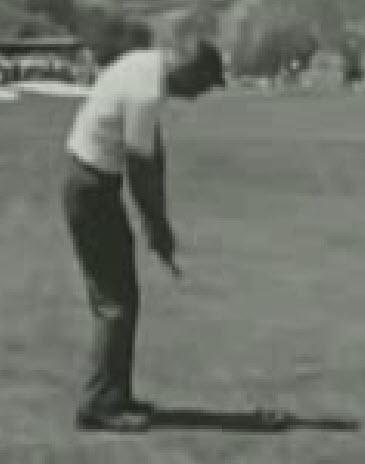
With so much variation amongst the legends of the game, it’s hard to say that modern golf posture-ology is a notion to buy into. Nice “C” posture by Arnold Palmer didn’t keep him from playing legendary golf. So stand tall and be ready to move.
Upload

Dustin Johnson and Jamie Sadlowski perform a similar pre-takeaway uploading movement. They both stand up just before taking the club away. This extends their hips, knees and spine while helping to keep the hips level and shift the entire spine to the right side in the takeaway.
Once there, the left shoulder can turn under your chin (slight left lateral bend on backswing). And that’s how you keep your head still!
Common Errors
Amateurs try to coil and keep the weight on the inside of the right foot. This will cause an early firing of the right leg and ultimately create a stall at impact.
Be sure to avoid squatting or adding knee bend on the backswing. This will likely cause a jump/stall at impact.
Right Load
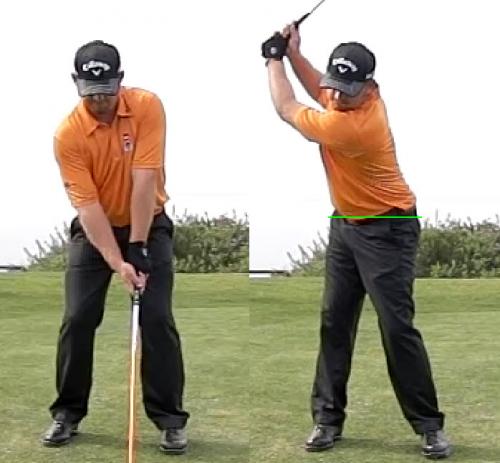
In order to get right loaded, you need to shift to the right, straighten your right leg a little and rotate your right knee away from the target. Keep the hips level by using your back muscles to prop up your left hip.
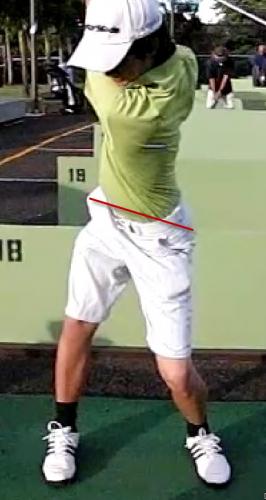
Avoid the typical amateur’s lowering of the left knee/left hip. Excessive left knee bending on the backswing can cause the hips to tilt excessively instead of staying level. This in turn can cause the spine to lean toward the target on the backswing.
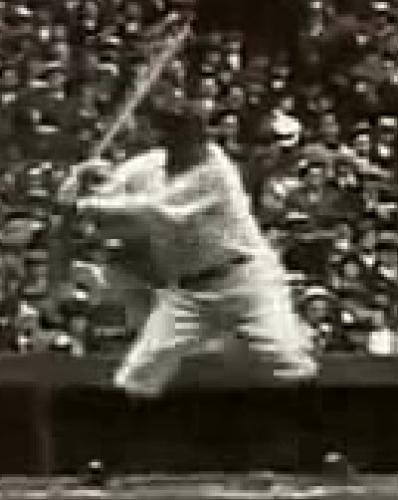
Would Babe Ruth (turned righty) lean toward the pitcher? It is athletic nonsense to do so. Having a slight weight shift does contribute to power on the downswing. But let’s not get carried away with too much weight shift on the downswing... read below.
Rotation Dominated Downswing
Current instruction favors a huge slide to the left and posting on the left side. If you know you’re going to flip it at impact, maybe you should slide just to get better contact. But if the Curad approach to swing-fixing hasn’t made you better, perhaps it’s time to fix the problem at the root?
Great rotation of the spine on the downswing is necessary to hold lag and avoid a flip. Rotation and lateral motion are inversely related. Thus, if you slide, you won’t rotate very well. If you don’t rotate well, you will most likely fire the shoulders (right shoulder internal rotation) and arms early which ultimately condemn you to a flip or flip/roll release. Contrastingly, if you rotate well, you can more easily get your right elbow more in front (external rotation and adduction) which is truly the key to holding lag.
Weight shift in two phases

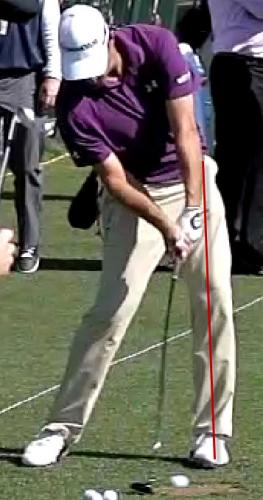
Here’s a clear demonstration by Gary Woodland. At impact, the tailbone should be away from target and the left hip should remain behind the left ankle. Right foot stays almost flat on the ground showing that much of the weight is still on the right side. End of follow through shows right hip extending till the end with the thrust of the pelvis finishing the weight shift onto the left side.
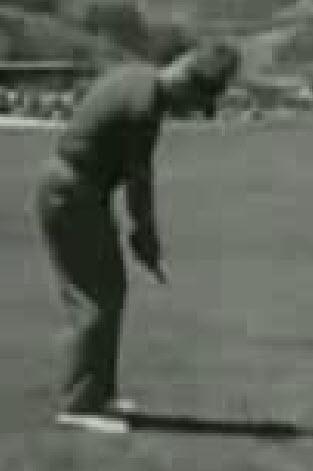
Duck Drill
Many of those who lose their spine angles at impact fail to identify where it is coming from: the excessive slide and lack of tailbone moving away from the target at impact.
Here’s Robin Cocq from France performing the duck drill. The follow through could be performed even more strictly than this by keeping the right foot flat and butt sticking out/away from the target until the end of the swing.
See Alvaro Quiros’ butt cheek showing? It means his tailbone moved away from the target while his hips are very open at impact. It is the key to great rotation.
Scott Stallings Variation
Stallings uses the left foot pull back to make you think he’s shifted left. Instead of shifting left, he pulls his left foot back then stands up on his left side to please the “post on the left side” crowd. Tiger 2000 also did this move so it’s not so outlandish.
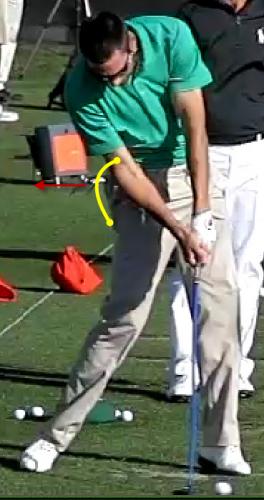
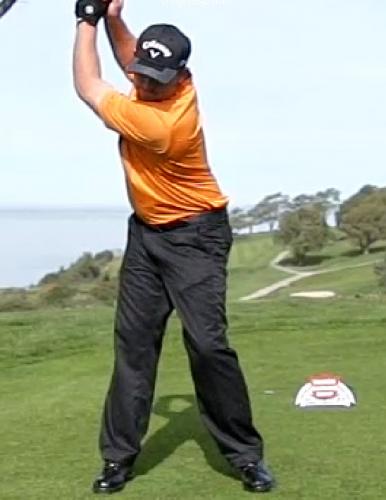
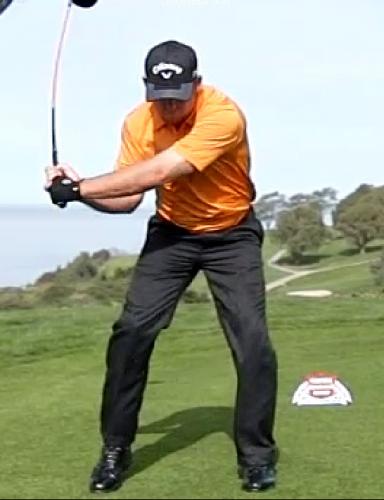
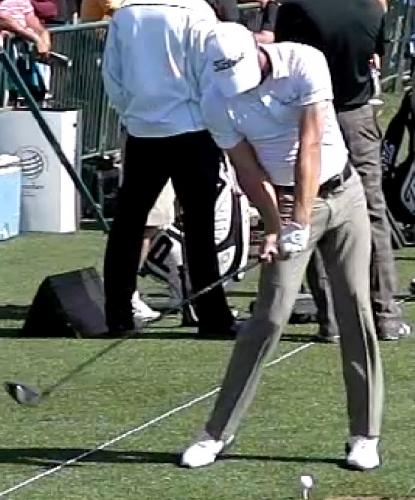
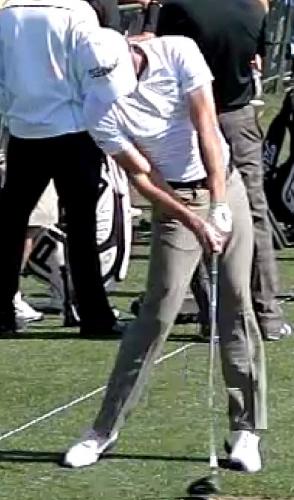
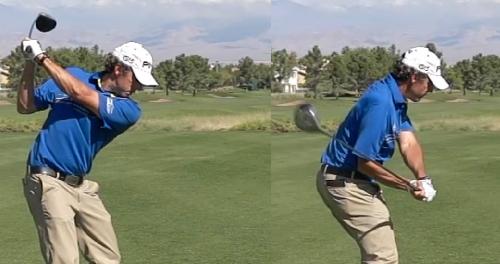
JB Holmes and the Marching Move
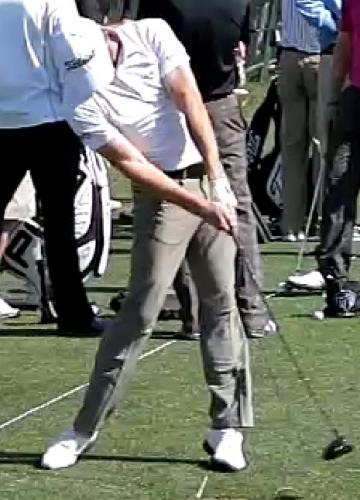
Many followers trying to copy Sam Snead’s squat have overcooked the move to the point where they squat down for too long, stay in left hip external rotation for too long and lose rotation. So here’s an alternative to that. JB does the “marching move” whereby his left knee extends while his right knee flexes to create fast rotation at the start of the downswing. Observe how the right heel is already off the ground (see above middle picture) and his left knee straightened early with right knee bent (see second picture below).
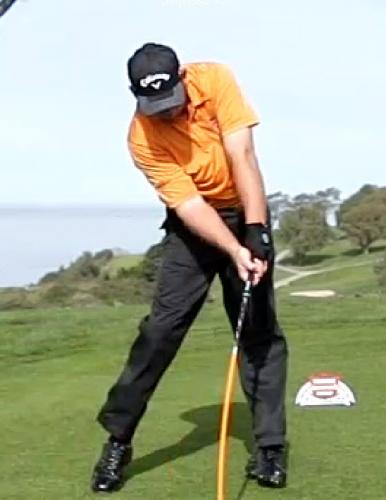
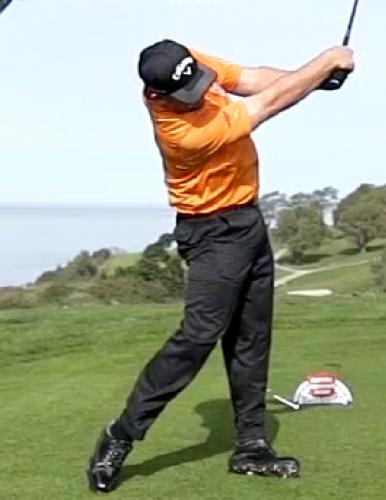
From that position, JB rotates his body without any additional weight shift to the left until post-impact, massive left foot spin and finishes with a minor left-foot pullback a la Stallings.
Clubfaceology
Once you’ve got the body movements mastered, the most important factor for a drive/holder is clubface control. If the clubface gets too open at any point in the swing, a good golfer will figure a way to close it rapidly. But in doing so, this is increasing the clubface rate of closure making errors much more dramatic.
Popular instruction views the “release” as some form of a flip/roll. Therefore they are very afraid of a flip/roll hook. Thus, at every position, their intent is to open the clubface more and more until there’s little chance for the flip/roll hook. Never mind that it most likely perpetuates and may even exacerbate the flip/roll.
For slicers, this kind of Band-Aid cure could change one’s ballflight from a huge slice to a huge hook or from a huge hook to a weak fade. What does that accomplish? Well, if you can’t get your desired results then you need better timing………yada, yada, yada. You can then improve by spending thousands of practice hours on the range.
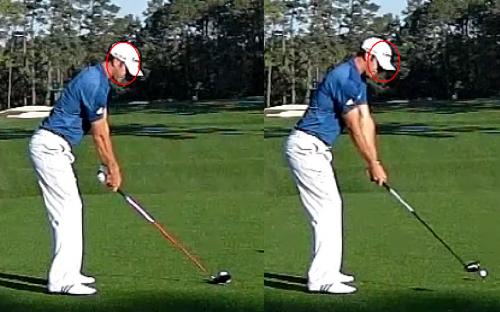
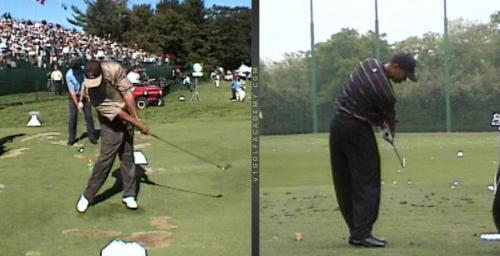
Key Clubface positions
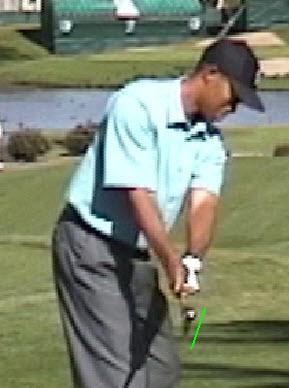
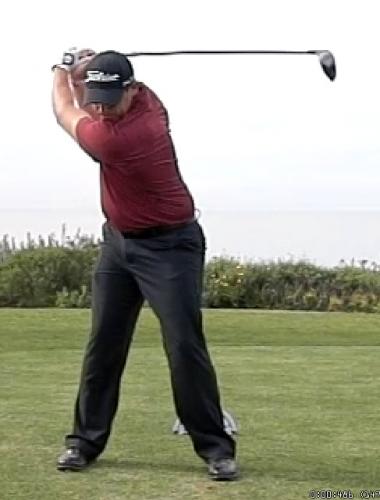
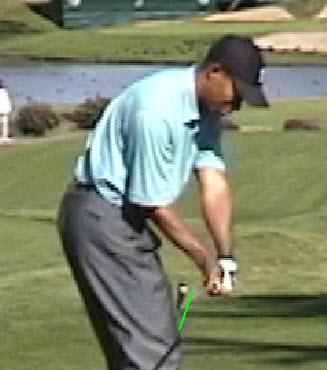
Keep the clubface pointed slightly down from vertical. Tiger was about 20 degrees down from vertical here. These are good reference positions to copy.
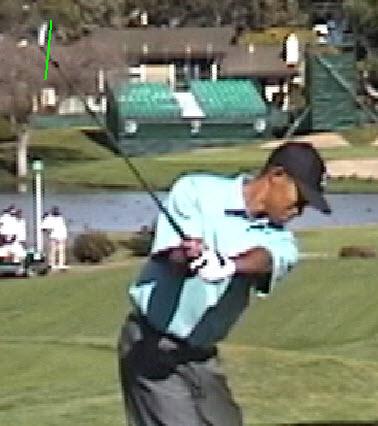
Here he’s about 6 degrees down from vertical.
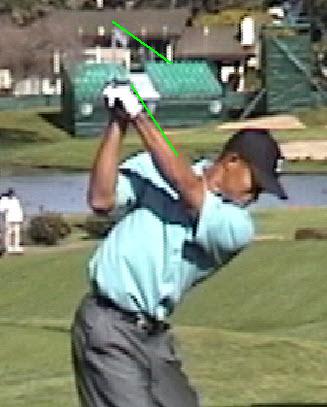
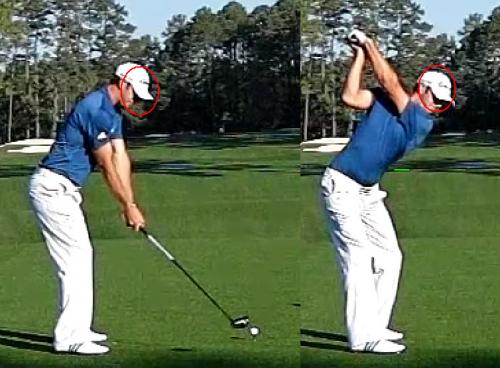
Clubface is about 35 degrees down from vertical. This would be considered a closed clubface by popular instruction.
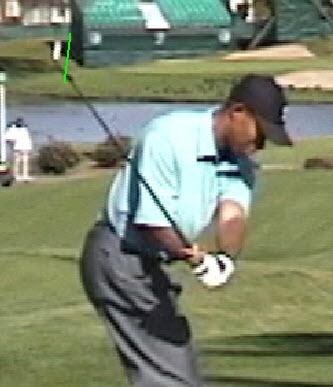
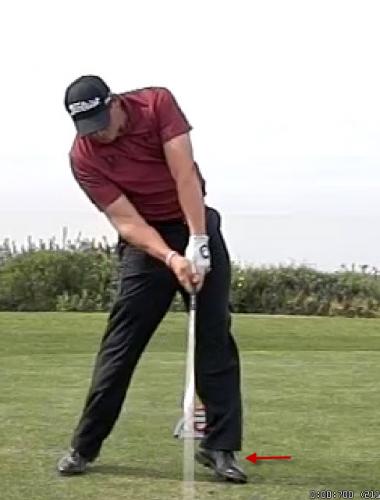
7 degrees down from vertical. External rotation of the right shoulder and right elbow movement will create an opening of the clubface which must be balanced by right forearm pronation/left forearm supination. This also begins to shift the lag retention force from radial deviation to right wrist extension/left wrist flexion!
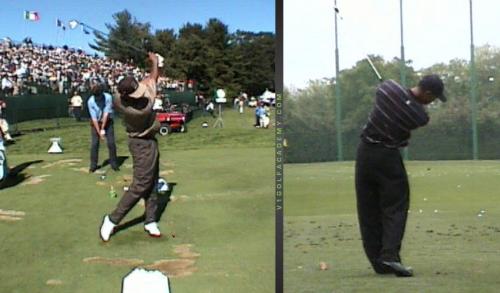
And here he’s about 20 degrees down from vertical.
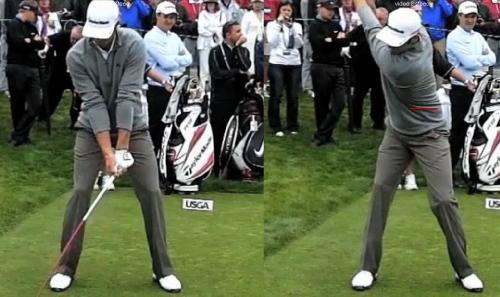
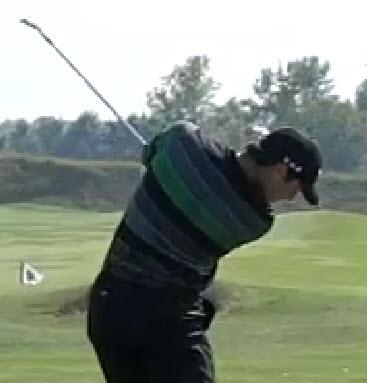
Impact Zone Clubface Stability
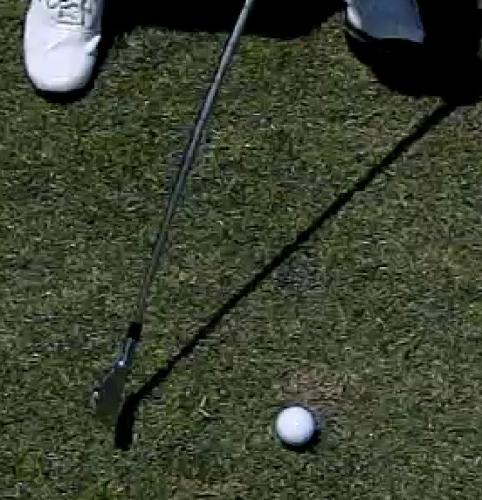
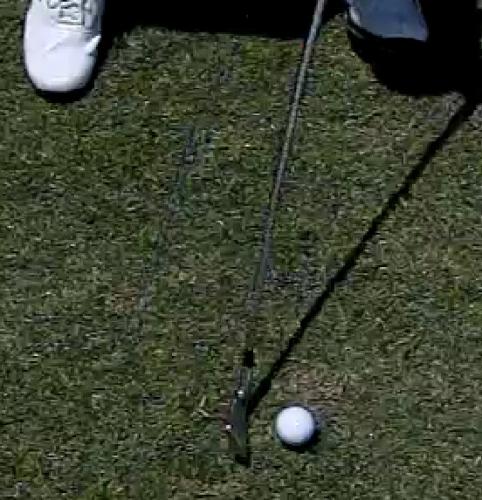
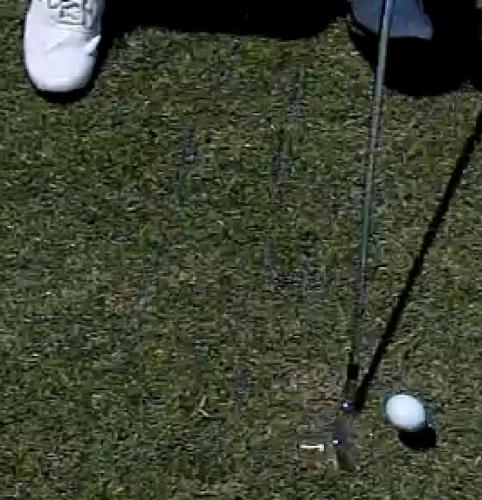
This is JB Holmes clubface as it moves through impact. The ultimate goal for all of these clubface positions is to create a square clubface at impact with as little last millisecond changes as possible. If the clubface is too open and is closed rapidly (or too closed then having to open rapidly), there’s much less chance you’ll be hitting it straight consistently.
A good way to train these clubface movements is to do them slow motion and in front of a mirror. Stop at each checkpoint and be sure you feel what your muscles are doing to achieve them.
Release Movements
Supinate the left forearm early, bow the left wrist and drive through trying to keep the hands/wrists/forearms in as stable a position as possible.
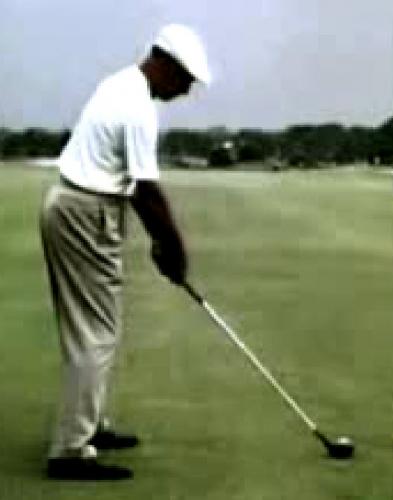
Planeology
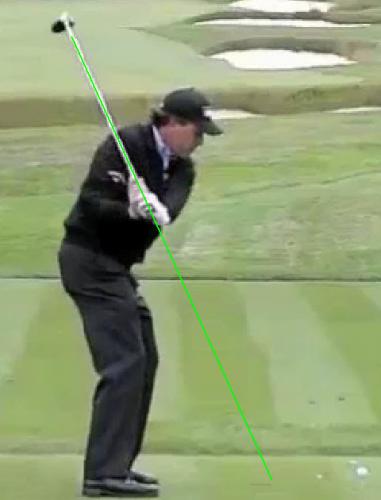
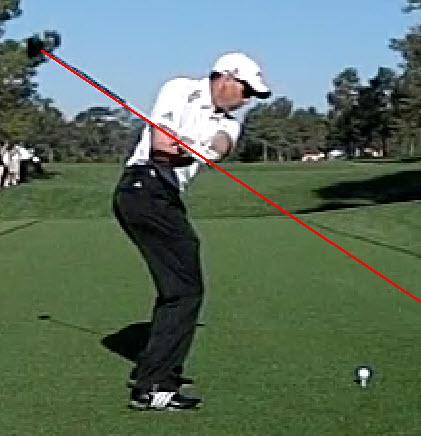
The ultimate goal of planeology is to direct the club toward the target at impact and create an advantageous angle of attack to strike the ball, depending on the shot at hand. But when one’s plane is too far off from desirable, other last millisecond changes must be employed.
Phil Mickelson’s steep downswing must be flattened (and he does) whereas Sergio Garcia’s must be steepened (and he does) in order to accomplish these goals. Phil does so with late external rotation of his right shoulder (opens the clubface) while Sergio does so with early internal rotation of his right shoulder (invites a flip).
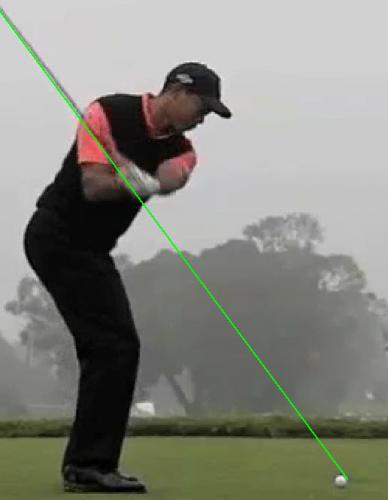
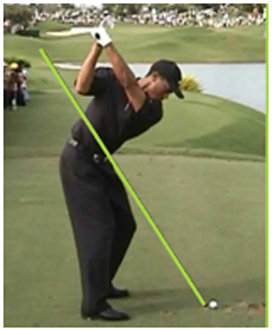
Forget having a preset idea of where the club’s plane should be based on address position! The general idea should be to have the club run through your upper bicep as Tiger 2008 does and get the shaft lining up to the ball. Once there the club should track on the plane (or somewhere near) through till impact.
Also, slightly steeper backswings are preferred since overly flat backswings get the club and right elbow stuck.
Is there a good reason to be this flat? Maybe this idea of swinging on one plane is just an excuse for amateurs swinging over the top?
If you swing flat enough on the backswing, you can swing over the top and still be on plane! Yikes.
Skipping Stones
Check this out. There are stone skipping pros!
Getting lateral bend should be as easy as skipping stones on a lake. Or the side-armed throw of a second baseman to first base would be similar as well. Just doing this motion will create the correct right elbow move and lateral bend you need.
Scapula Movements
Many movements in the golf swing are reversible and escapable. But one that appears to be very difficult to avoid is incorrect scapula movements. Perhaps due to the deep instinctual way the body wants to move, once the wrong pattern is evoked, it is nearly impossible to stop. What movement am I talking about? Freestyle swimming stroke.
http://www.110pounds.com/?p=8592
See the animation at the top of the page. If you start your backswing with a retraction of your right scapula (as in a flat, one plane backswing) as you would in swimming freestyle, then lift or elevate your scapula, you will undoubtedly swing over the top. By doing these two motions in this sequence (and creating a back-to-front circular movement), there’s only one other option left and that is to fire over the top (early right shoulder protraction and internal rotation).
Thus, if stuck in this mode, try doing the opposite or a backstroke in swimming. Start the backswing by lifting your right shoulder then retract the scapula and then drive the elbow. This will trigger the backstroke instinct and a correct downswing movement.
Positions
1. Set up
- Back of shoulders over the balls of feet
- Tailbone close to heels

2. One piece takeaway
- Club stays outside hands
- Arms lifting
- Slow but early bending of the wrists up (radial deviation)
- Right forearm should feel like keeping clubface from opening (pronation)

3. Early shoulder turn
- Hands under collarbone at halfway back
- Slow roll of left arm (internal rotation) as arms elevate
- Turn is about 75% complete here
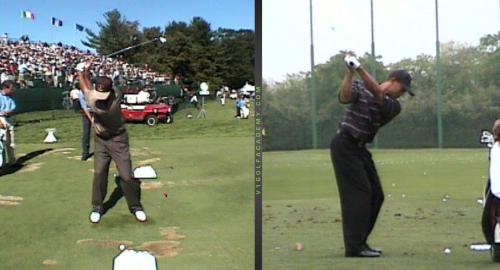
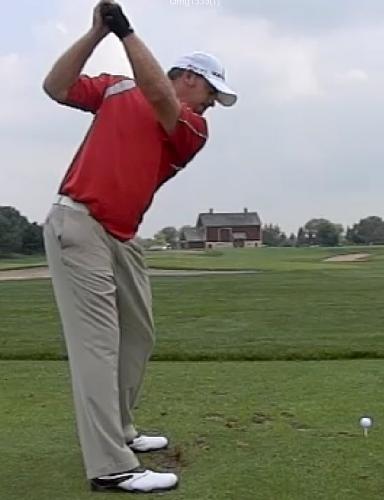
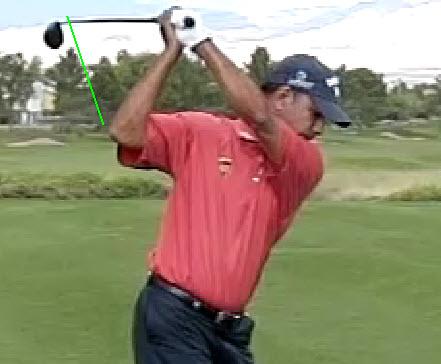
4. Butt end of club over right shoulder.
- Slightly laid off since not reaching parallel.
- Right elbow stays in front (adduction) and folds
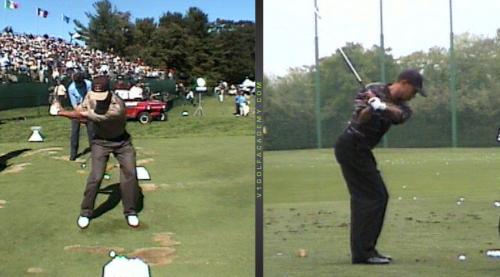
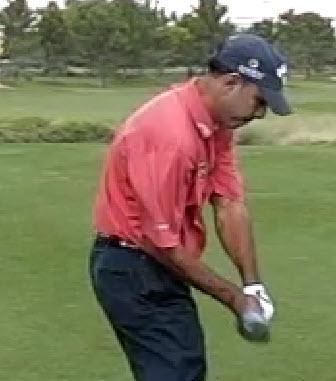
5. Left arm matching feet line as early as possible with slight lateral bend
- Try to get elbow out in front of the right hip
- Hips return to square as early as possible
- Tailbone moves away from target
- Start shifting lag pressure from radial deviation to back of right wrist (extension) and left wrist bowing (flexion)
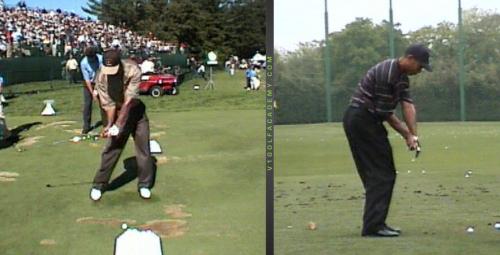
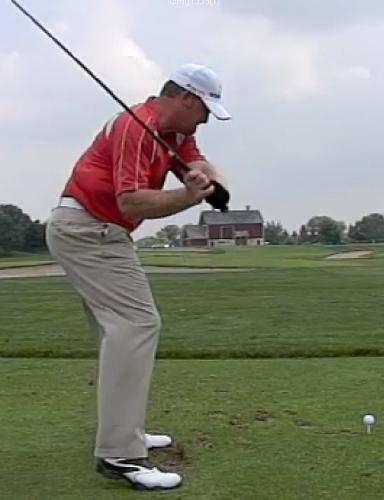
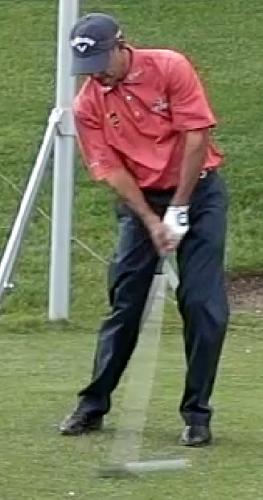
6. Club on plane or slightly under
- Right elbow still driving ahead of hands
- Side armed throw with right side
- Rotate lower body and rib cage
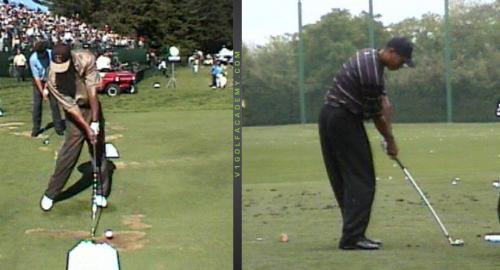
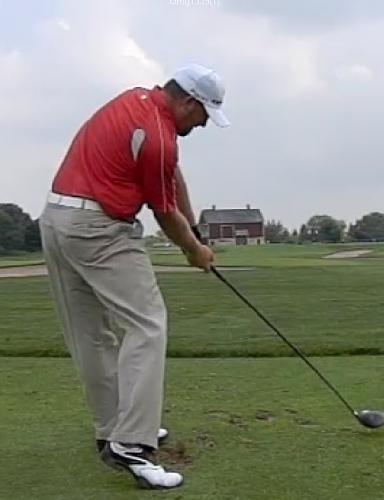
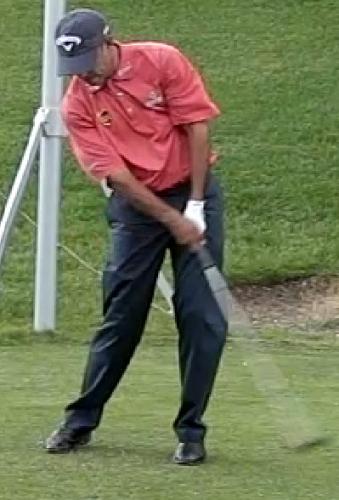
7. Hips open by 45 or more degrees. Shoulders 10-20 degrees open and tilted.
- Shoulders should not catch up or pass hips
- Should see “S” bend in spine from target line view instead of “C” bend or loss of “spine angle.”
- Left hip stays behind left heel at impact (front view) – chi line even on irons. See right butt cheek behind hands at impact. This means tailbone moved away from target.
- Left wrist bowed with left forearm rotated to square the clubface
- Keep left elbow pointed at target
- Iron swings have less lateral bend at impact with chest more on top of the lower body whereas driver swings will have more lateral bend which pulls the upper body back away from the target to create a shallower angle of attack.
8. Full extension of arms reached post-impact
9. Clubface is not rolled over. Clubface square to the shaft from target line.

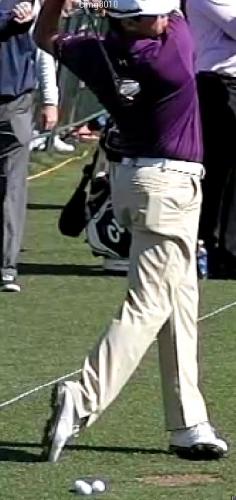
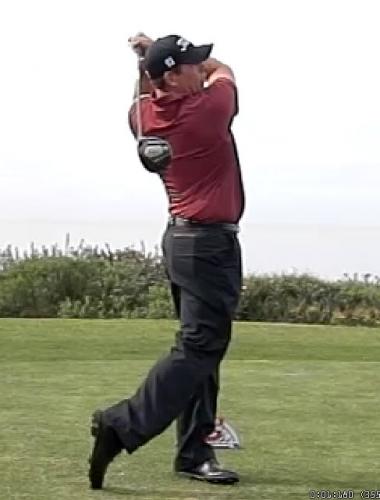
10. Hold off or rolling finish? Tiger’s drive/hold follow through shows how hard one must work to stop the clubface from rolling over. It’s far easier to just roll the arms and relax to the finish but it does not produce anywhere near the clubface stability at impact.
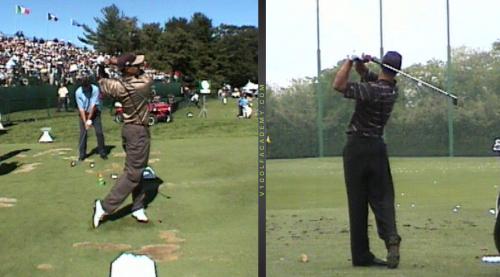
11. Cupped left wrist with clubface open on follow through.
Hopefully this will help everyone understand the big picture of what’s required to swing better and swing more like a tour pro. I think there’s good reason to copy great athletic swings and stop putting Band-Aids on your tired, old swing.
Notes

Jared Sawada qualified for the 2014 Sony Open earlier this week! Congratulations to Jared. He’s been working very hard on his game and certainly deserves to be rewarded for his effort.

http://www.t-zonevibration.com/
I have found a great exercise for spine health as well as fitness/muscle building for lazy people. It’s called a vibration machine. Yes, it’s outside the box (in terms of thinking), but since Rafael Nadal uses a vibration machine to train, I thought it would help me too.
There are many brands but the one I got is the T-Zone vibration machine. You can just stand on it for 10 minutes a day and the vibration causes stretch shorten cycle muscle contractions all over your body. It has really improved my spine mobility/flexibility.
I’ve regained movement back like I’m 20 years younger and my serve speed has gone up almost 10 mph. I’ve also lost 10 lbs from when I started and this is just a long-term program that can be done for years since I can watch TV while on the machine. What’s also great is that my movement on the court is better. It’s far easier to hit balls on the run now which no doubt comes from the body learning to create stability from the unstable vibrating surface.
Some of my students have gotten it as well. One senior golfer lost 20 lbs in about six months and gained 20-30 yards on his drives (some of it came from good golf instruction though???). Women love the vibration machine as it slowly tones muscles and burns fat with no impact.